The premium source package
In this article
In addition to providing you the implementation of data models, migrations, repositories, dependency injection components, that ASPSecurityKit requires to give you the unmatched flexibility and extensibility, the Premium source package also gives you the implementation of several important common workflows including,
- Account management (register, login, two-factor auth, forgot password, account settings, IP firewall management, email verification)
- User management (add/remove/suspend users, permissions)
- Administration (impersonation, transfer)
- Security event notifications
- Production-ready error handling
and much more, right into your project as source code – models, views, controllers or API endpoints with best practices (async, managers, dependency injection, error handling) – without writing a single line of code!
Note
ASPSecurityKit fully supports legacy ASP.NET Frameworks including ASP.NET MVC5, ASP.NET Web API and provide source packages with the same capabilities for them. In the below steps, we’ll mention the corresponding .NET Framework package for the programming model you choose.
For any question or to report any issue, feel free to contact us at [email protected].
Before you begin
This walk through requires:
- You’ve read the introduction article and have familiarity of two types of ASPSecurityKit packages: library and source packages.
- You’ve bought an ASPSecurityKit plan to generate the license key. If you instead want to evaluate ASPSecurityKit before purchasing the license, you should follow the trial walkthrough.
- If you haven’t got a Premium source package, you can buy it against your ASPSecurityKit library license from the dashboard.
Create the project
-
In Visual Studio, open the Create a new project dialog.
-
Choose the programming language as CSharp and ASP.NET Core Empty as the template.
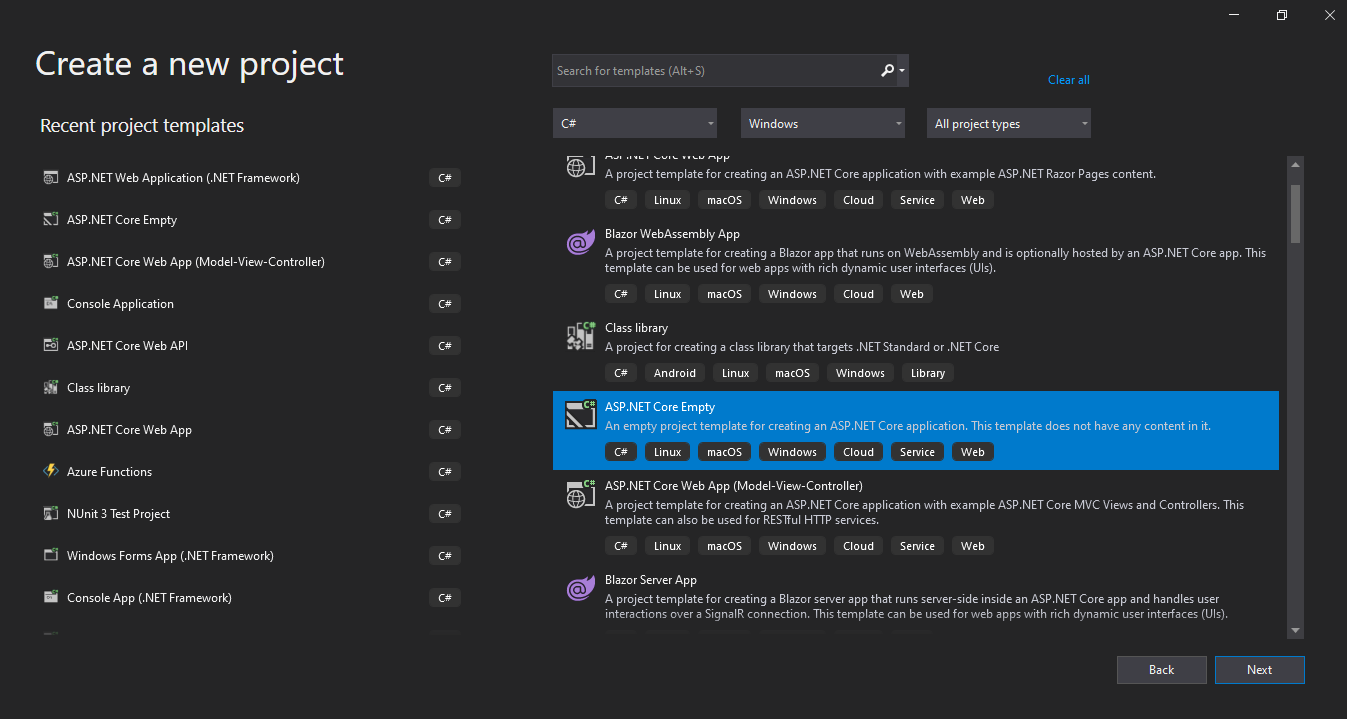
Note
If you’re building on the .NET Framework, choose ASP.NET Web Application (.NET Framework) and then Empty template.
- Provide the project name and other information.
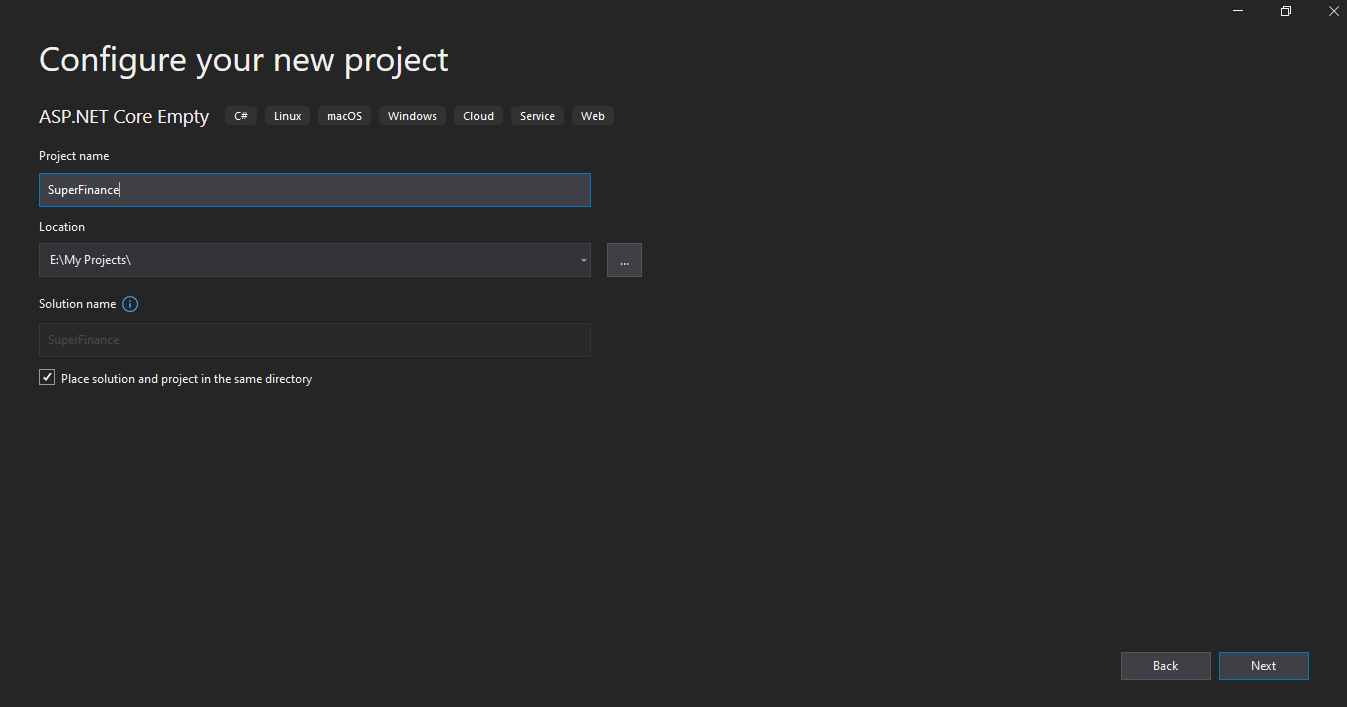
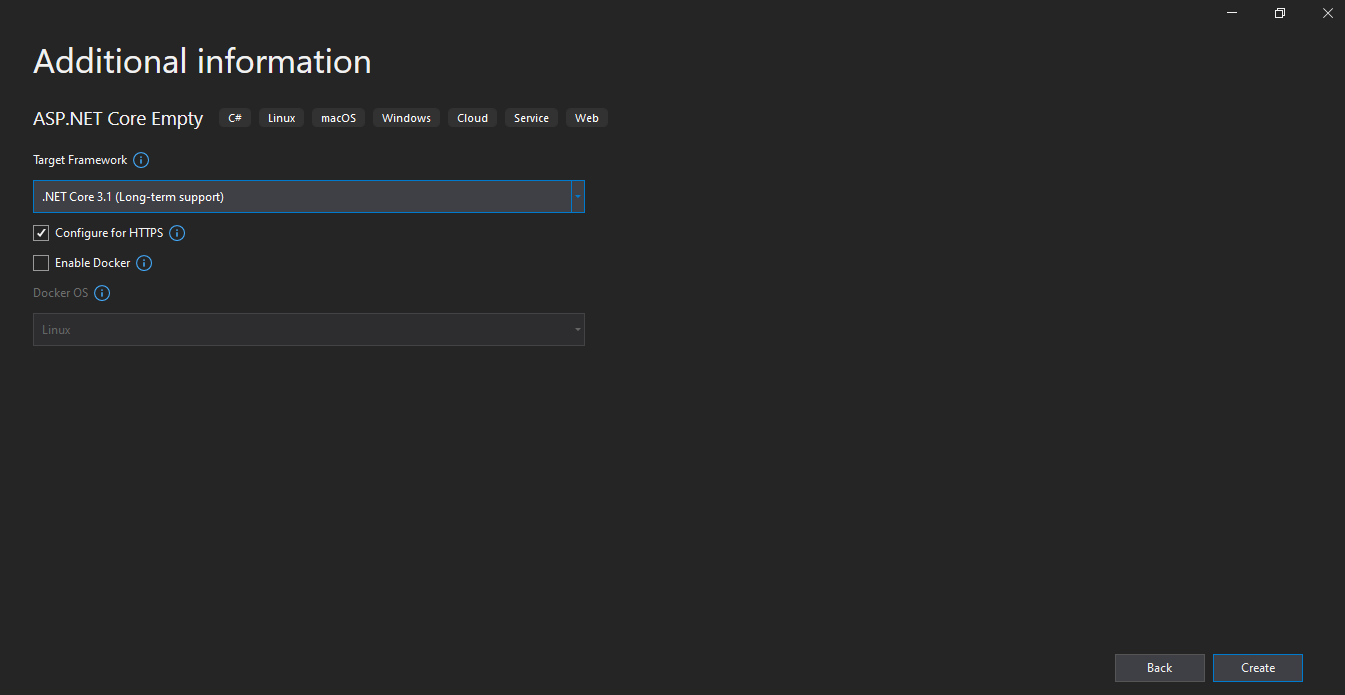
- Choose the target framework as ‘.NET Core 3.1’ and click on the Create button.
Install the ASPSecurityKit library package
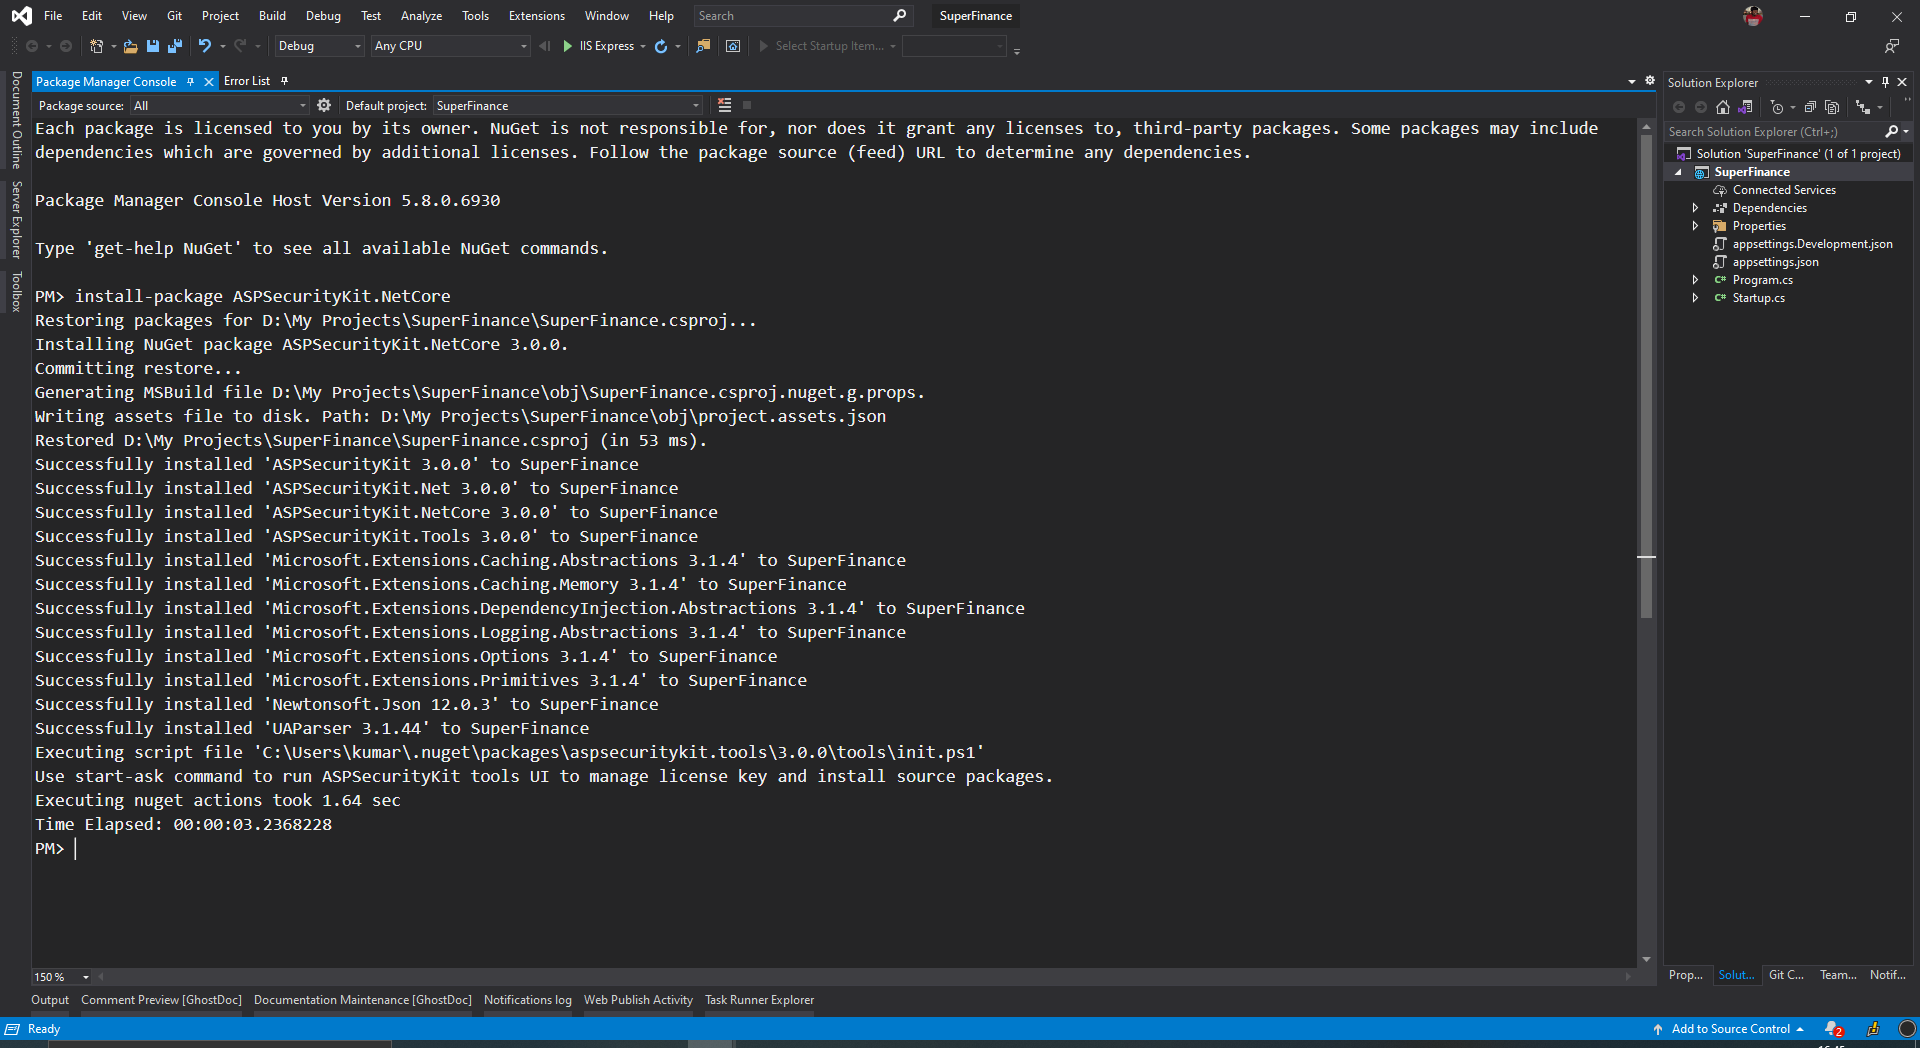
As part of this step, we’ll install the ASPSecurityKit.NetCore NuGet package, which provides full ASPSecurityKit capabilities to build secure and reliable API platforms/services on ASP.NET Core. Check out the comprehensive security pipeline article to understand the multi-stage identity and access verification workflow ASPSecurityKit provides.
- Open Package Manager (PM) Console and make sure that the selected project is the web application project just created.
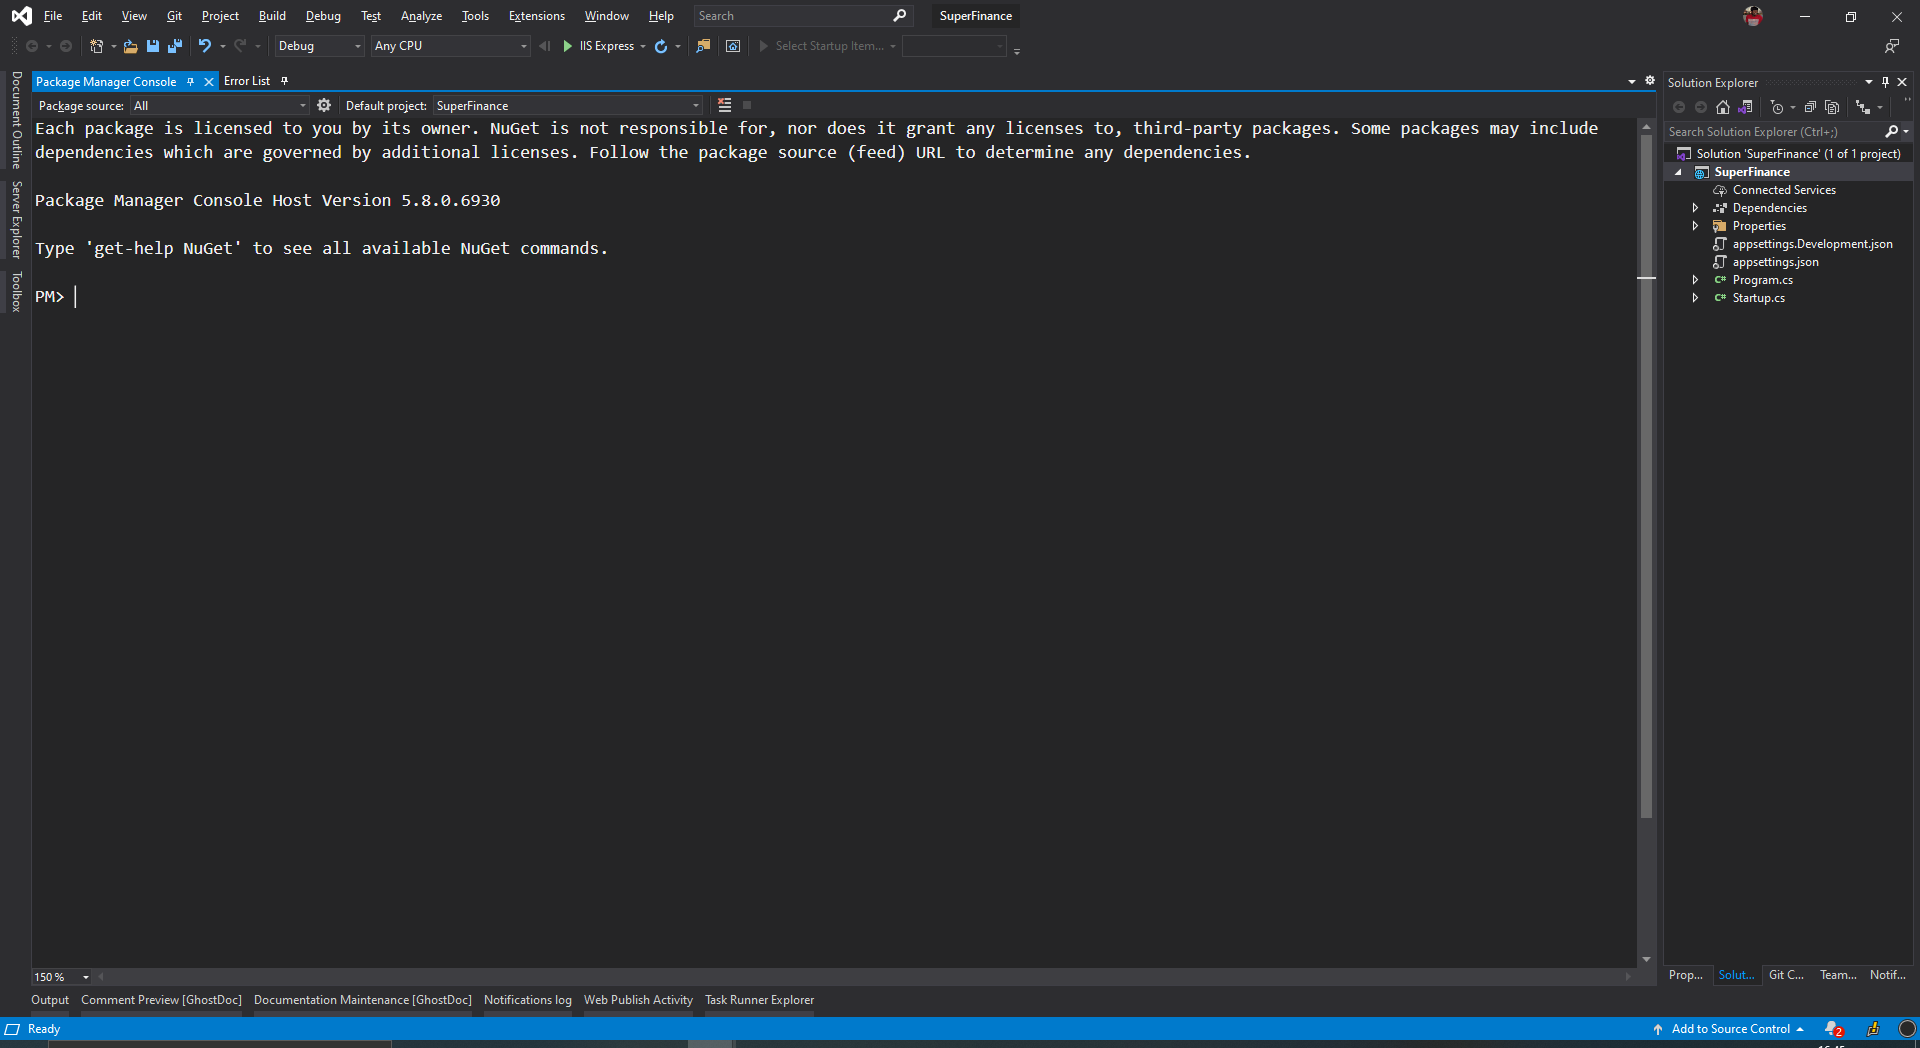
- Type the following command and hit enter:
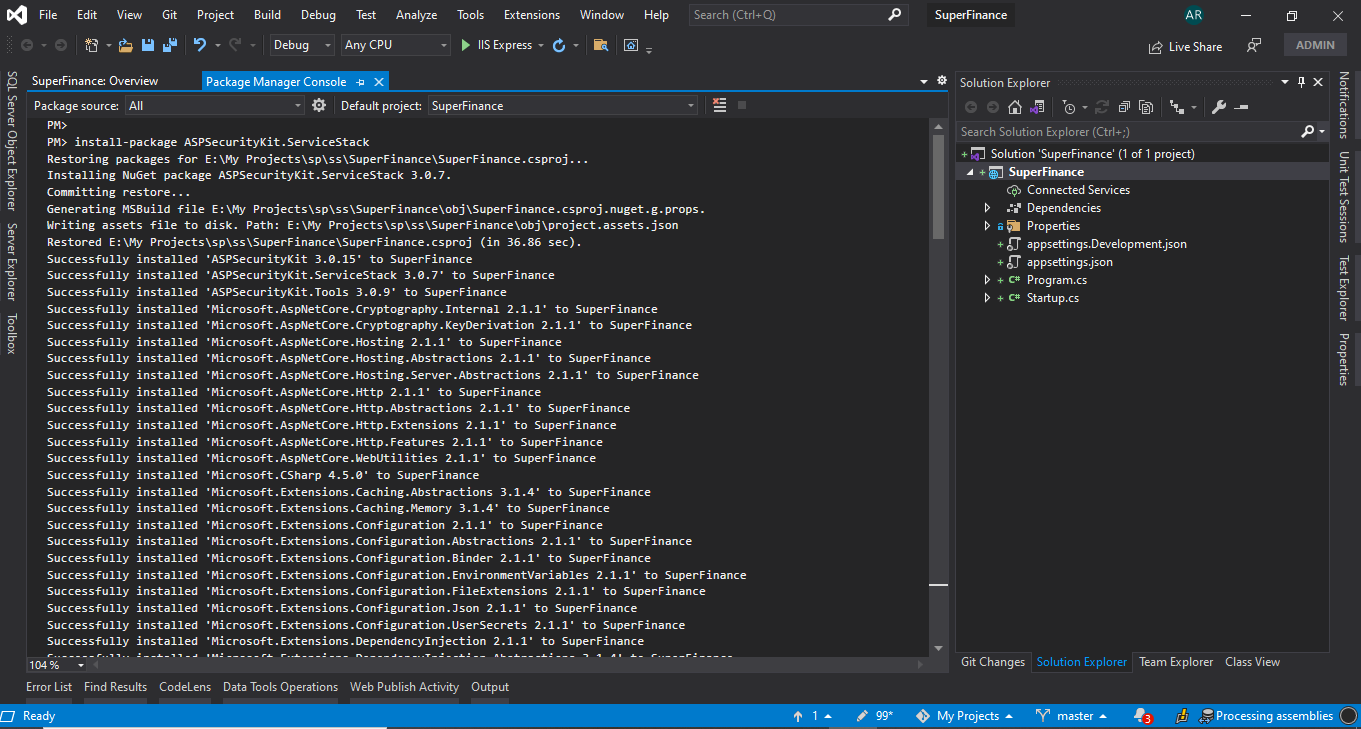
install-package ASPSecurityKit.NetCore
Note
If you’re building on the .NET Framework, instal the ASPSecurityKit.NetFramework.WebApi package instead:
install-package ASPSecurityKit.NetFramework.WebApi
- Make sure that the package installs successfully
You can also use the Package Manager UI to install the above package.
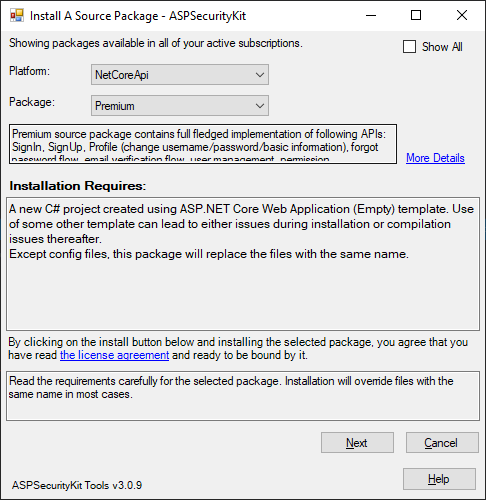
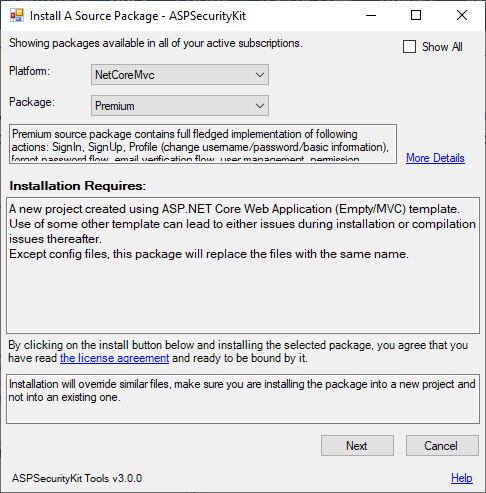
Install the source package into the project
As part of this step, we’ll install the Premium-ASP.NET Core API source package.
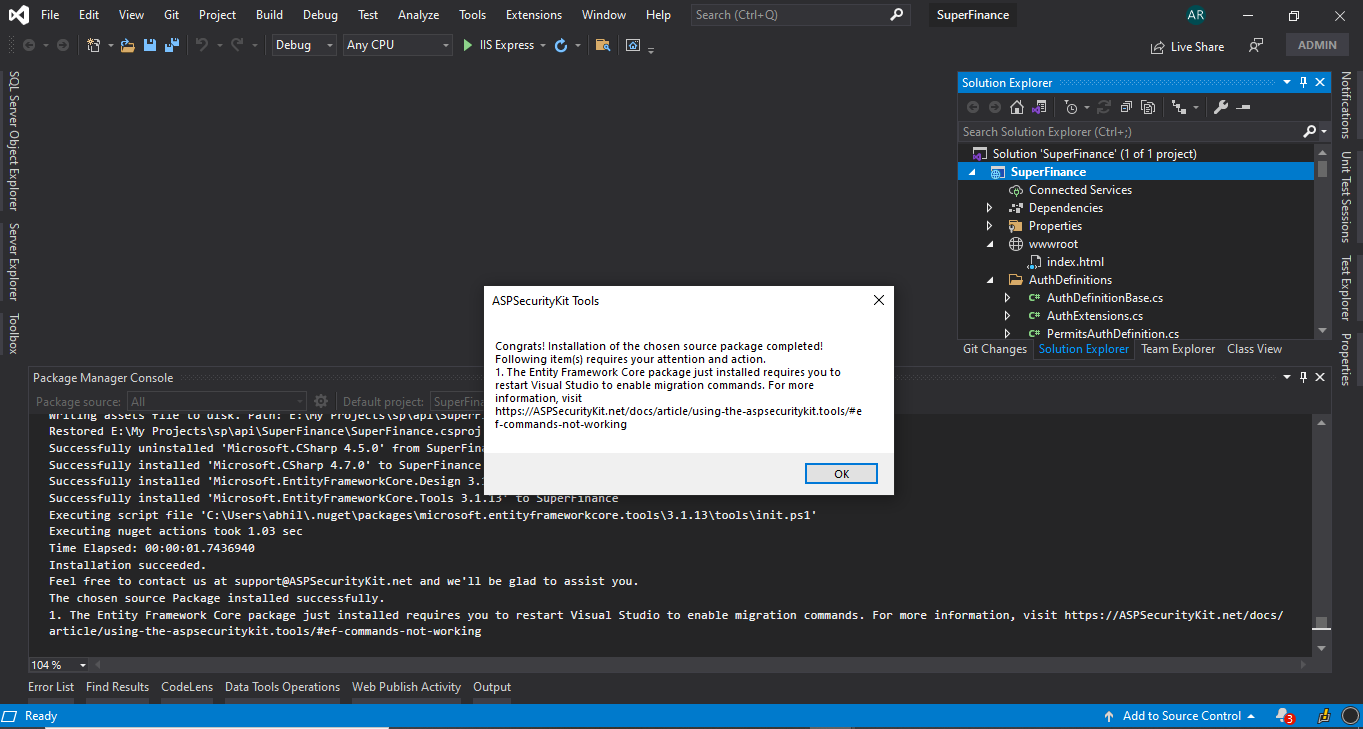
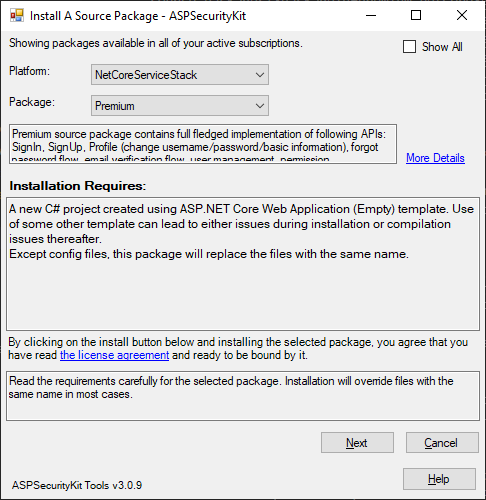
Follow these steps to install a source package. On the ‘Install a Source Package’ screen, make sure you select NetCoreApi as the platform (NetFrameworkApi if you’re building on the .NET Framework instead) and Premium as the source package. If the package doesn’t appear, it means you haven’t bought it. You can click on Show all checkbox and then click on the Buy button to purchase this package.
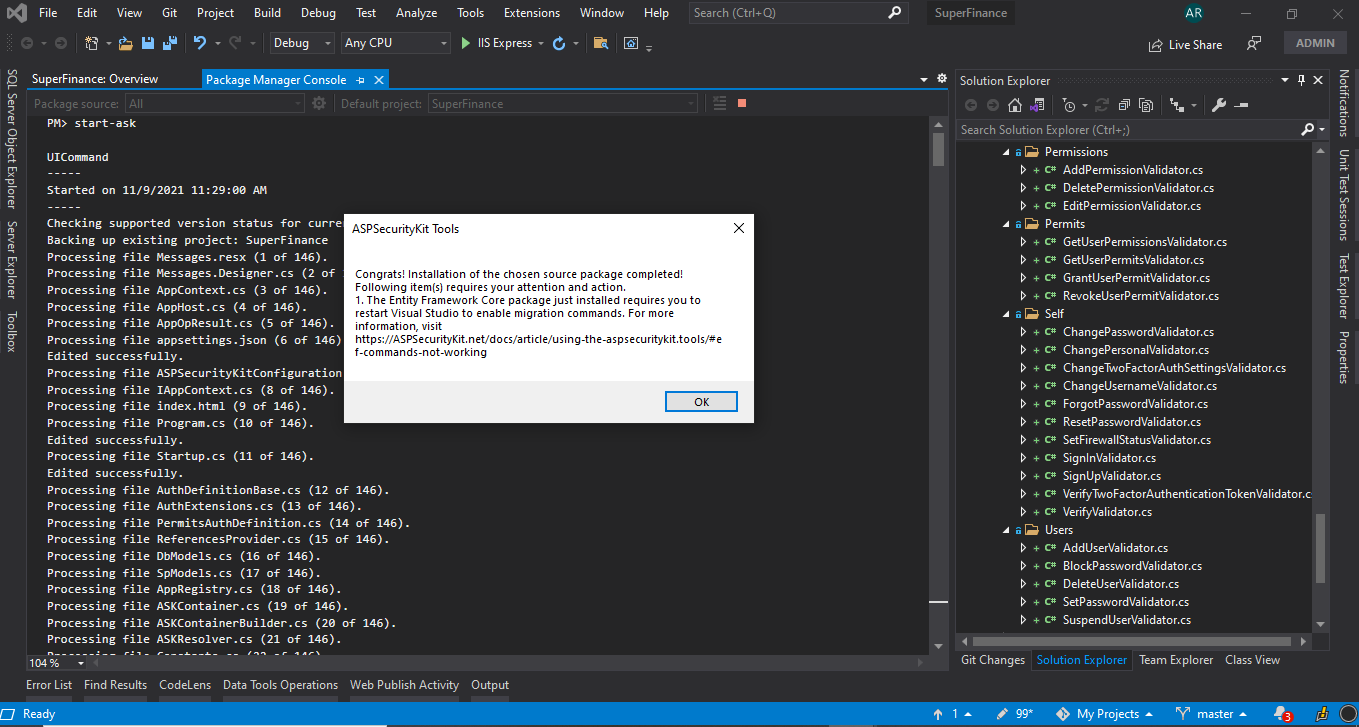
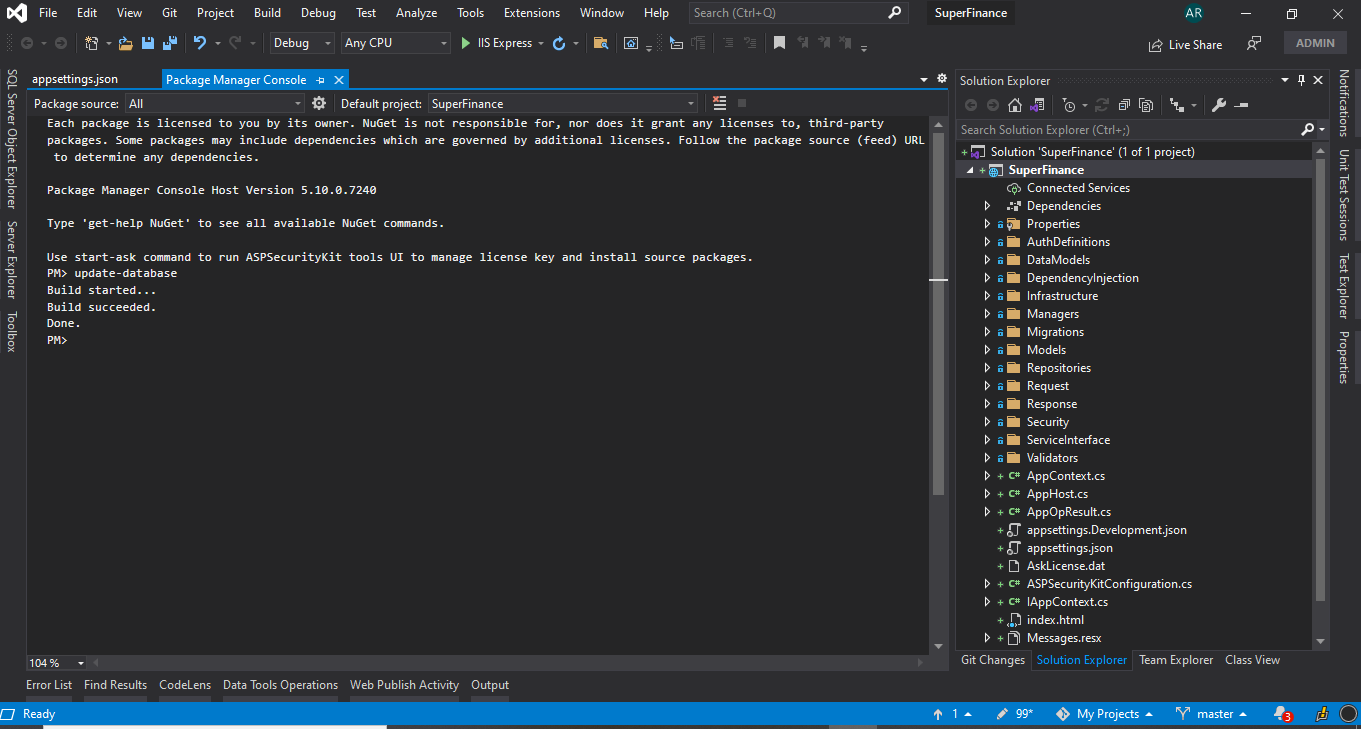
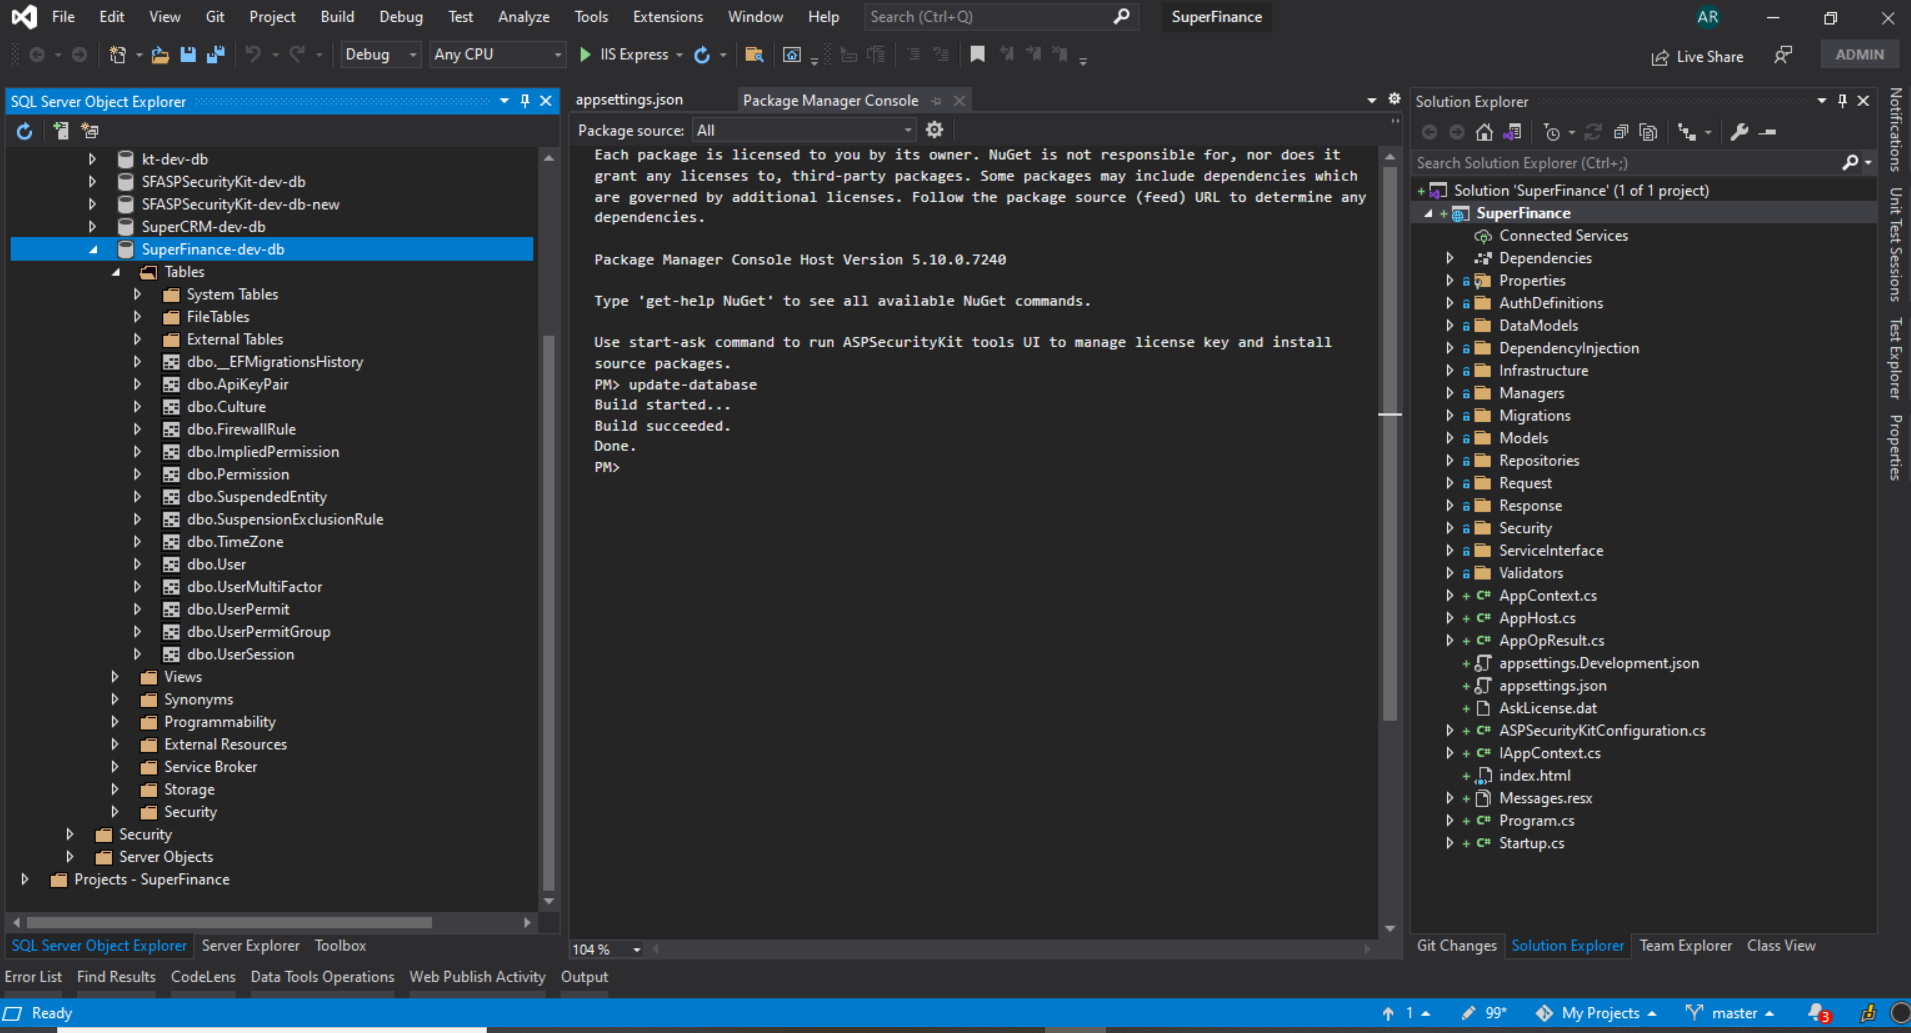
Upon successful installation, you should see several new items added to the project.
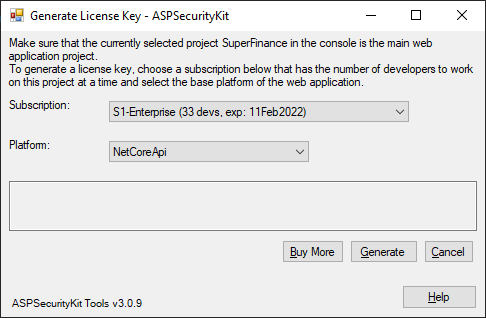
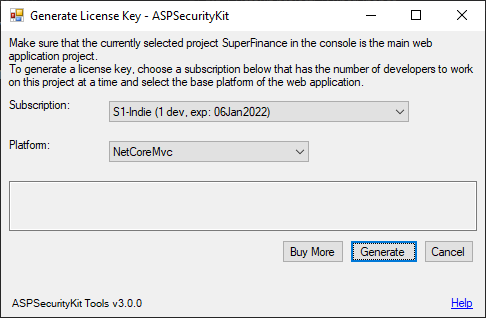
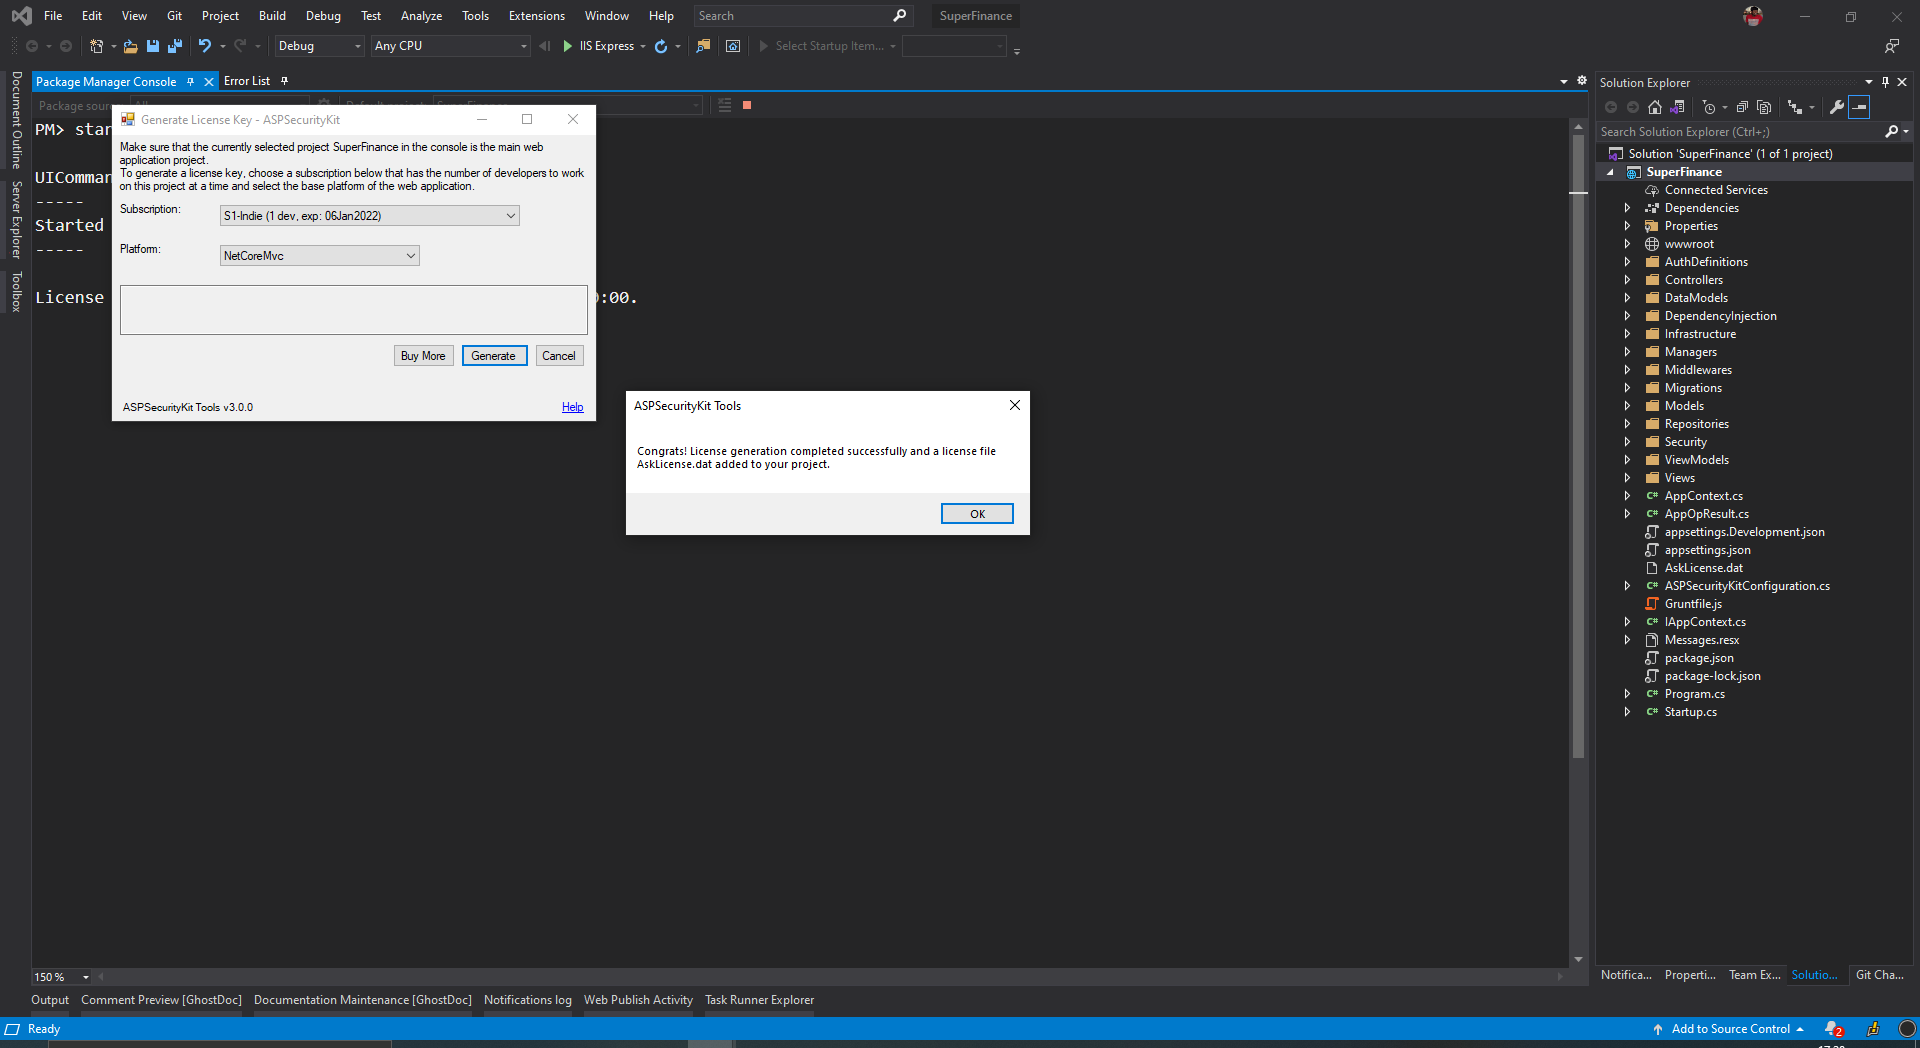
Generate license key for the project
You cannot perform subsequent steps without generating a license key for this project because the number of operations permitted for trial has been exceeded by the source code you’ve obtained from the Premium-ASP.NET Core API source package.
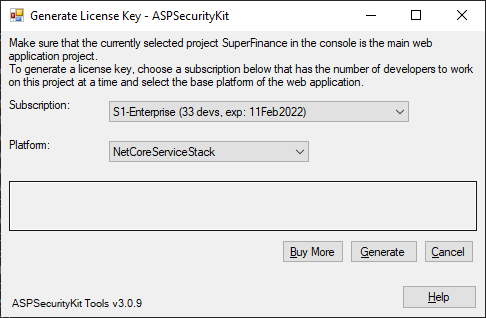
Follow these steps to generate a license key. On the ‘Generate License Key’ screen, make sure you select NetCoreApi as the platform (NetFrameworkApi if you’re building on the .NET Framework instead). If no subscription appears, it means you either haven’t bought one or have consumed it already. You can click on ‘Buy More’ to open the Dashboard to purchase a new subscription.
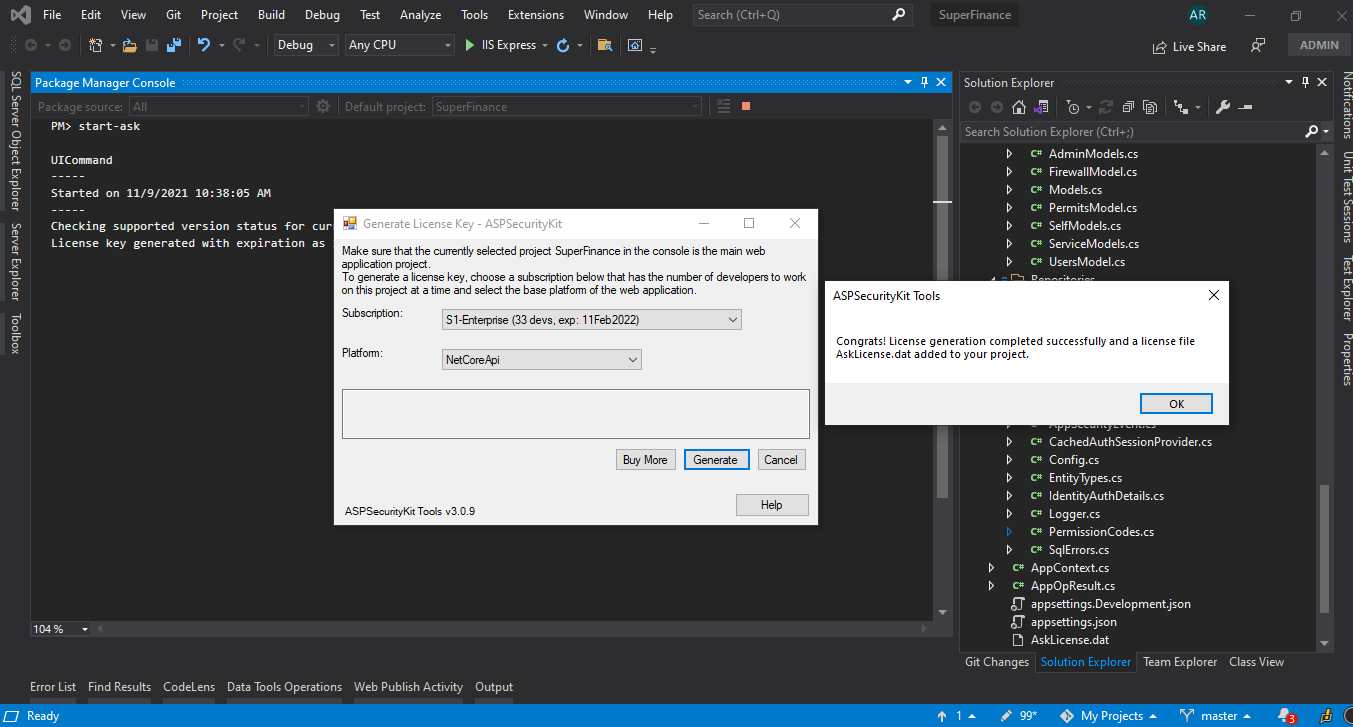
Important
Once a license key is generated, it cannot be revoked. It’s valid for the project it is generated. So do not generate a license for trying out, as you’ll not be able to reuse it in other projects. For trial, you can instead generate a trial key.
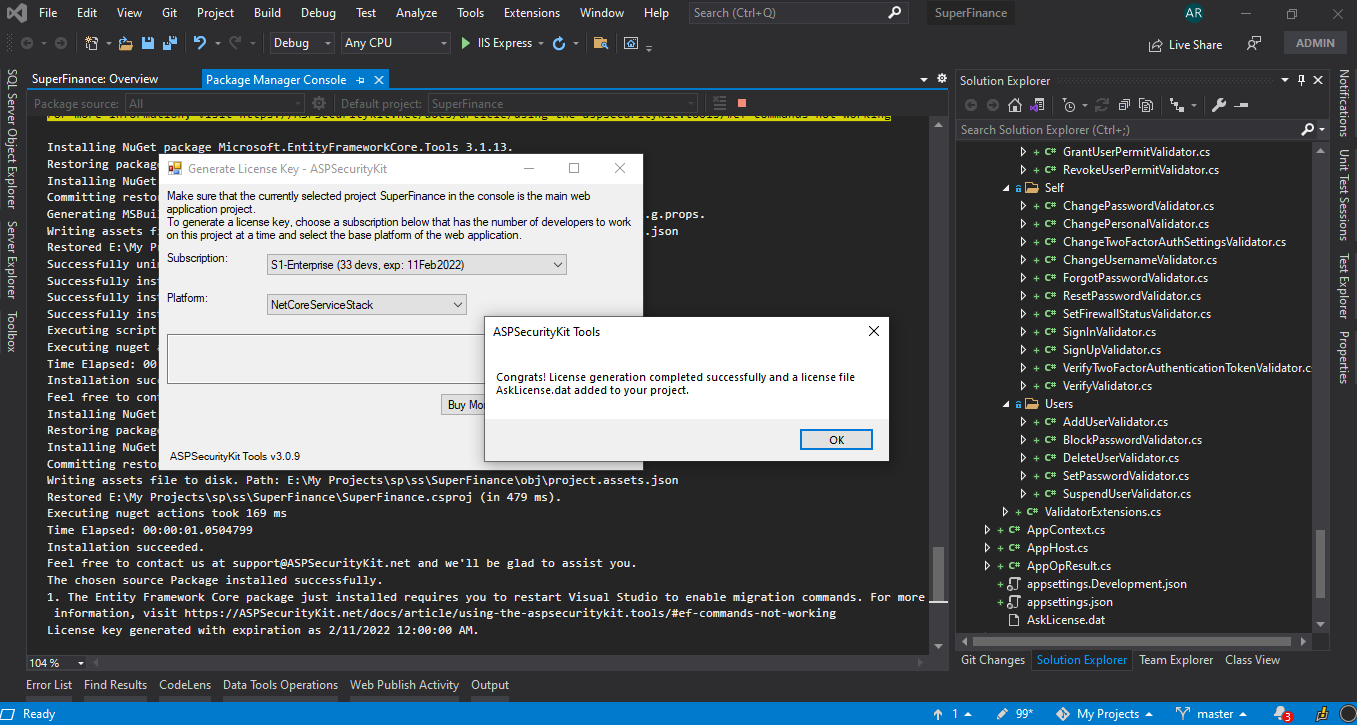
The premium-ASP.NET Core API source package comes with a logic that makes call to License.TryRegisterFromExecutionPath which instructs ASPSecurityKit to automatically locate and register the license key from file.
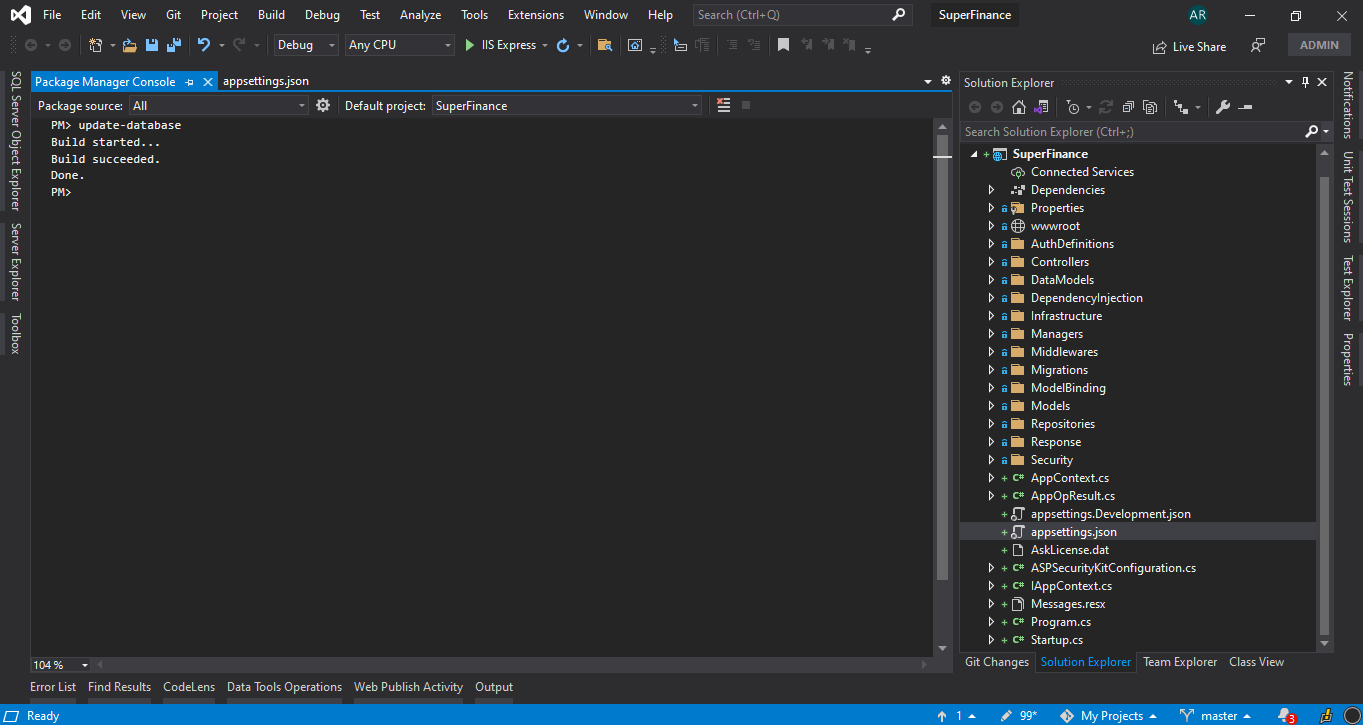
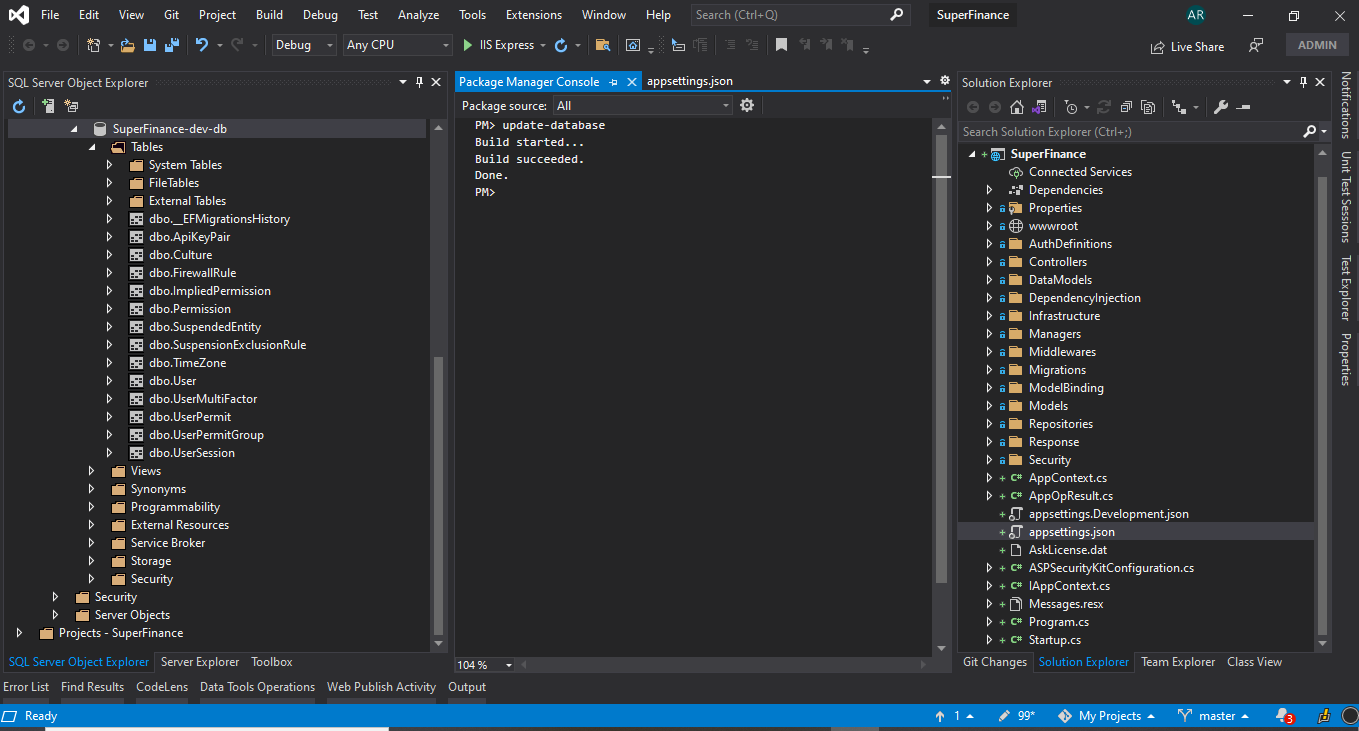
Create the database
The Premium-ASP.NET Core API source package we had installed in a prior step, comes with EF migrations and T-SQL scripts, so you can create the database backing the models of your new project immediately.
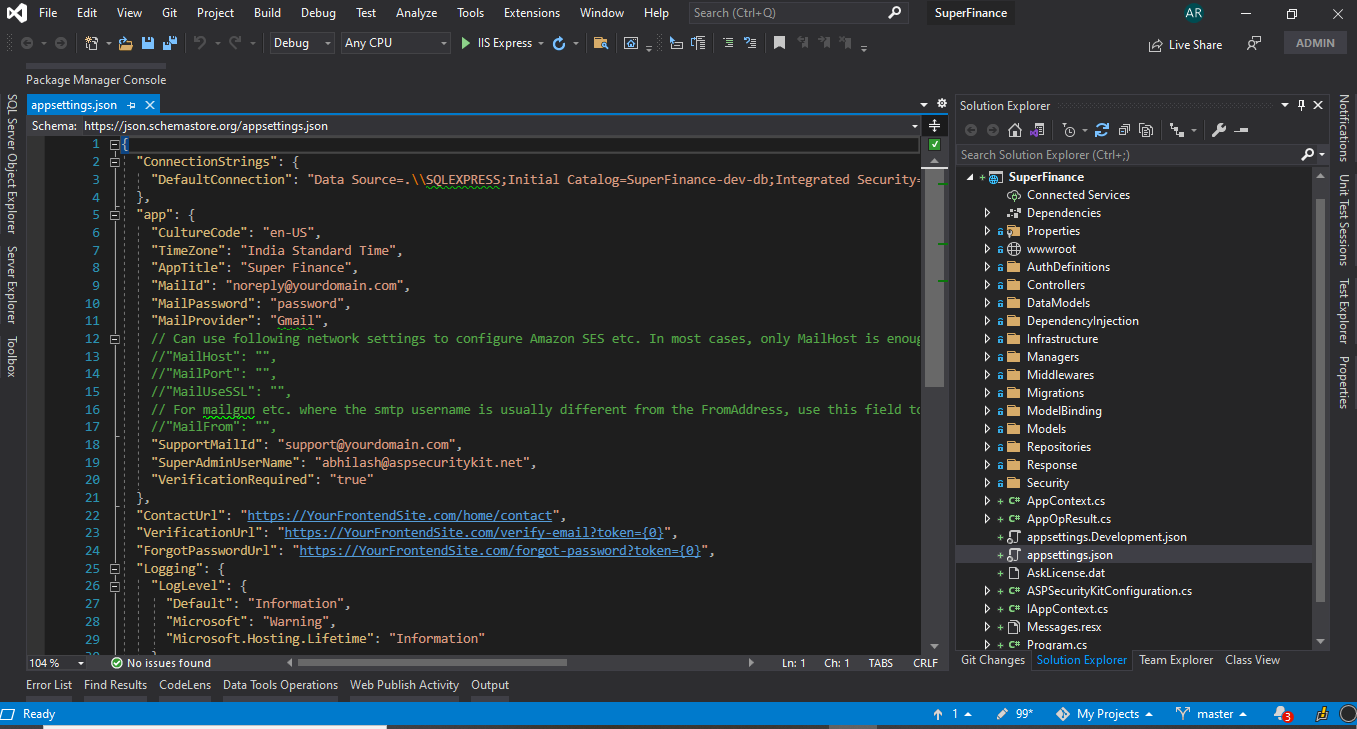
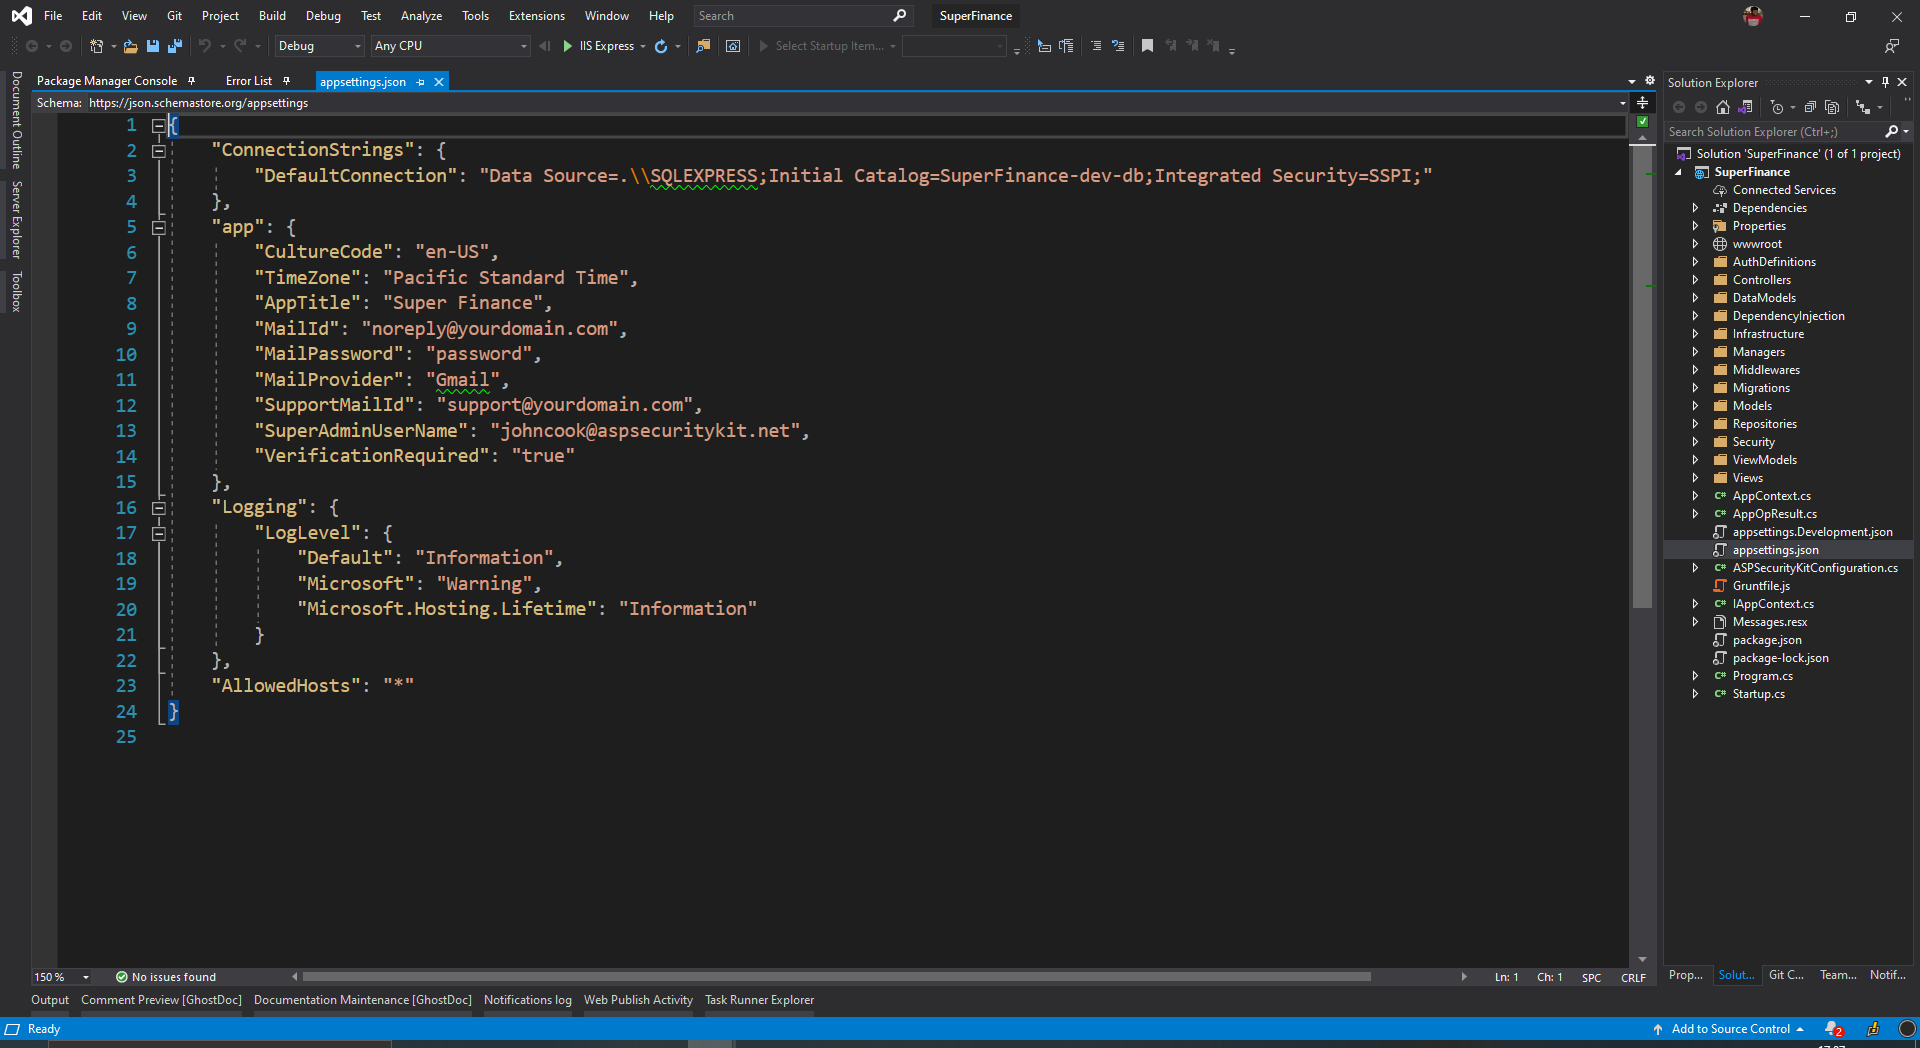
- Verify the connectionString: Open appsettings.json file from Solution Explorer and verify that the DefaultConnection has a valid connectionString as per SQL Server version available on your machine. If it’s not, make the appropriate changes.
-
Open Package Manager Console and make sure that the selected project is the web application project we’ve been working with in this walkthrough.
-
Type the following command and hit enter:
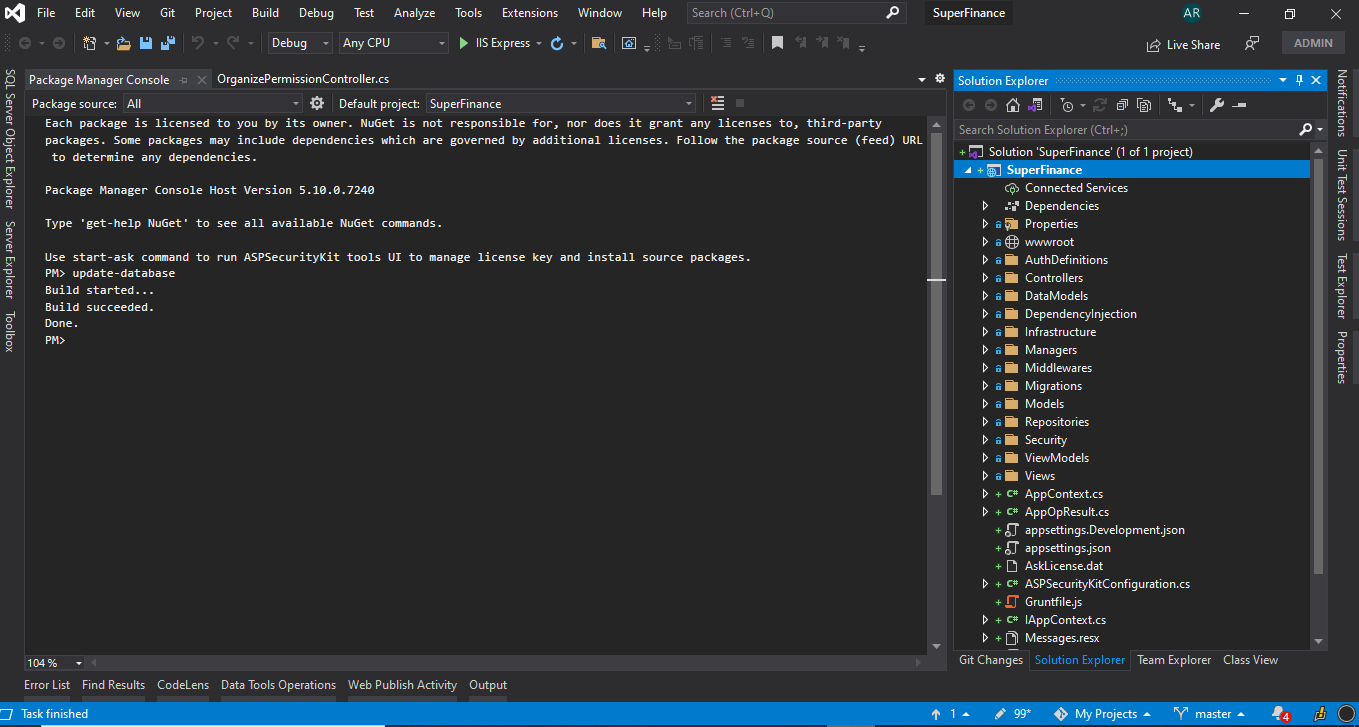
update-database
-
If you receive an error stating something like:
-
“The term update-database is not recognized as the name of a cmdlet, function, script file, or operable program.”, you should close and restart Visual Studio, and open the same solution. For more information about this issue, check out the troubleshooting section.
-
“This Evaluation license has a quota of … operations for NetCore feature which has been exceeded.”, you likely don’t have the license key generated, and the trial limitations have been exceeded. For more information about this issue, check out the troubleshooting section.
-
-
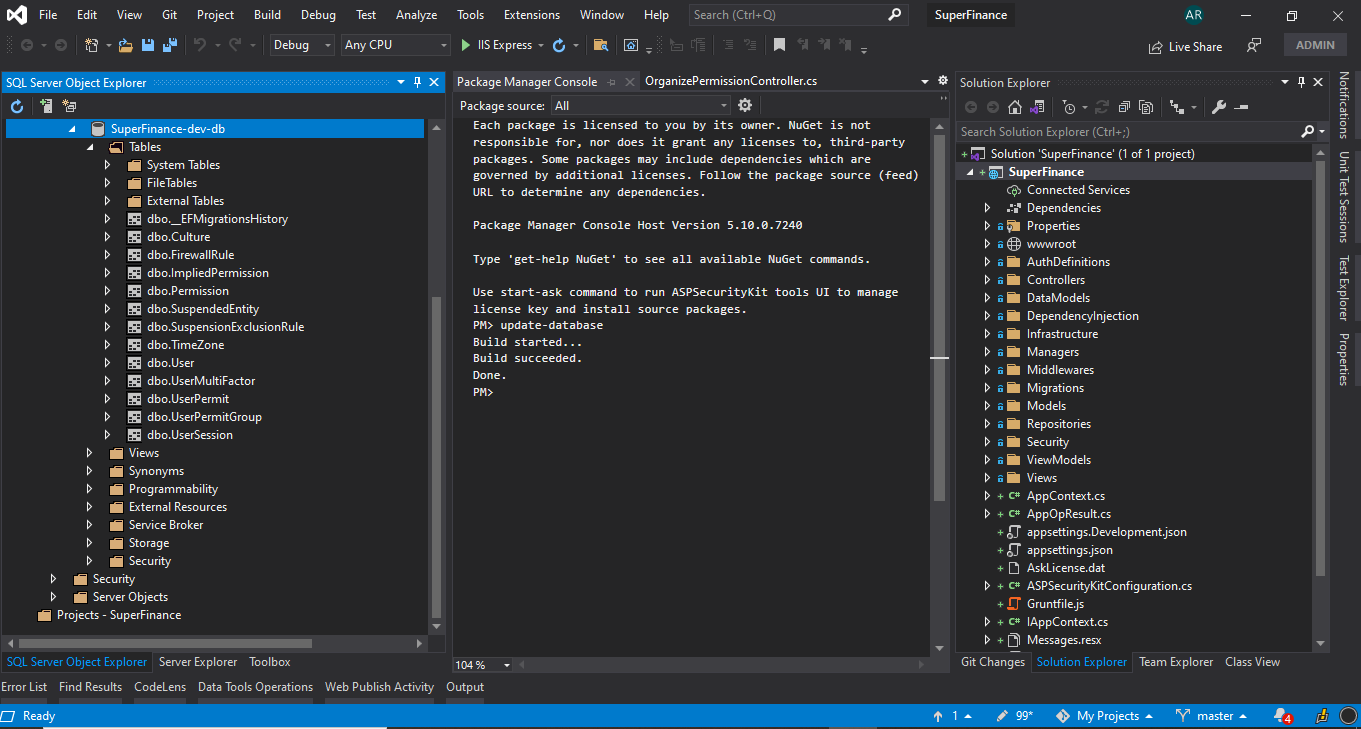
Make sure that the database is created successfully.
- You will see messages something like “Applying migration …”. If all goes well, the last message that you see is “Done” (with EF Core; with EF framework, it’s “Running seed method”).
Application Configuration
The Premium-ASP.NET Core API source package has also come up with some useful configuration settings that the accompanying components make use of. You can have a look at them in the ‘app’ section of the appsettings.json file in the project root.
By default, most are populated with the default value or values you provided on the second step of the ‘Install a Source Package’ screen. The following settings related to email component aren’t populated by default and are required for email verification and forgot password flows to work:
"app": {
    ....
    "MailId": "[email protected]",
    "MailPassword": "password",
    "MailProvider": "Gmail",
    // "MailHost": "",
    // "MailPort": "",
    // "MailUseSSL": "",
    // "MailFrom": "",
    ....
},
The above settings are used by the Mailer component installed as Infrastructure\Mailer.cs in your project. MailId and MailPassword settings represent the SMTP credentials.
MailProvider setting can take one of six values: MailGun, SendGrid, Gmail, Outlook, Yahoo and Custom.
Additionally, you can use a setting MailFrom to specify the ‘from address’ if it’s different from the MailId (the username). This is usually true when you’re using a service like MailGun or SendGrid.
With Custom provider you need to at least specify the MailHost which should be the SMTP server host name. Custom lets you configure services like Amazon SES to send emails.
As you get the source with the Premium package, you can further extend the Mailer component if you want any further customization.
Note
To use Gmail, you need to enable “Less secure app access” etc. on your Gmail account. For more information, visit the support page.
Try it out
Press F5/ctrl+F5 to run the application. You can sign in using the [super admin] credentials – username as in the settings and the default password ‘admin’. You can also sign up and try out flows like email verification and account settings.
Congratulations for installing ASPSecurityKit! You are going to absolutely love the secure, flexible and rapid development basis it provides for your project!
Create the project
-
In Visual Studio, open the Create a new project dialog.
-
Choose the programming language as CSharp and ASP.NET Core Empty as the template.
Note
If you’re building on the .NET Framework, choose ASP.NET Web Application (.NET Framework) and then Empty template.
- Provide the project name and other information.
- Choose the target framework as ‘.NET Core 3.1’ and click on the Create button.
Install the ASPSecurityKit library package
As part of this step, we’ll install the ASPSecurityKit.NetCore NuGet package, which provides full ASPSecurityKit capabilities to build secure and reliable modern MVC web applications on ASP.NET Core. Check out the comprehensive security pipeline article to understand the multi-stage identity and access verification workflow ASPSecurityKit provides.
- Open Package Manager (PM) Console and make sure that the selected project is the web application project just created.
- Type the following command and hit enter:
install-package ASPSecurityKit.NetCore
Note
If you’re building on the .NET Framework, instal the ASPSecurityKit.NetFramework.Mvc package instead:
install-package ASPSecurityKit.NetFramework.Mvc
- Make sure that the package installs successfully
You can also use the Package Manager UI to install the above package.
Install the source package into the project
As part of this step, we’ll install the Premium-ASP.NET Core Mvc source package.
Follow these steps to install a source package. On the ‘Install a Source Package’ screen, make sure you select NetCoreMvc as the platform (NetFrameworkMvc if you’re building on the .NET Framework instead) and Premium as the source package. If the package doesn’t appear, it means you haven’t bought it. You can click on Show all checkbox and then click on the Buy button to purchase this package.
Upon successful installation, you should see several new items added to the project.
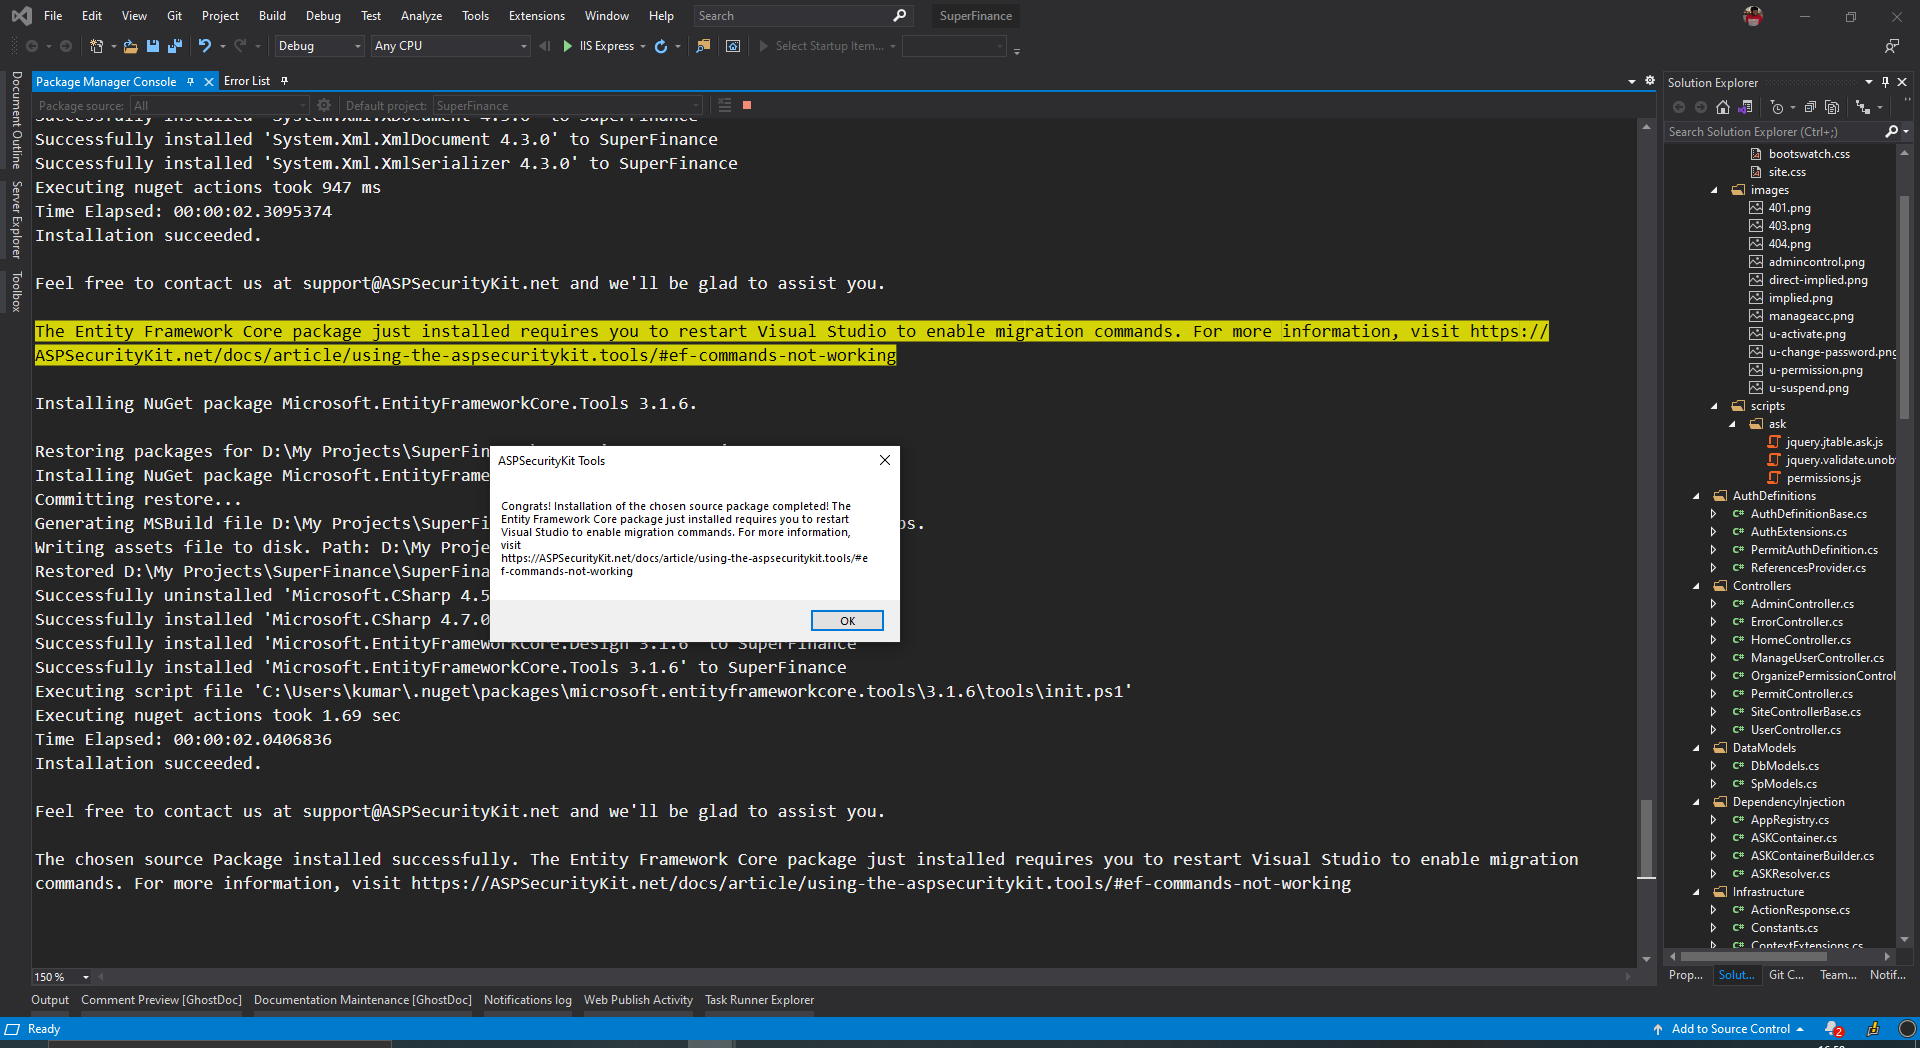
Next, make sure you also install the node dependencies. The Premium ASP.NET Core Mvc source package we’ve just installed have some script dependencies such as bootstrap, jquery, jtable, etc. which have been configured as NPM dependencies. (Not applicable for .NET Framework)
Generate license key for the project
You cannot perform subsequent steps without generating a license key for this project because the number of operations permitted for trial has been exceeded by the source code you’ve obtained from the Premium-ASP.NET Core Mvc source package.
Follow these steps to generate a license key. On the ‘Generate License Key’ screen, make sure you select NetCoreMvc as the platform (NetFrameworkMvc if you’re building on the .NET Framework instead). If no subscription appears, it means you either haven’t bought one or have consumed it already. You can click on ‘Buy More’ to open the Dashboard to purchase a new subscription.
Important
Once a license key is generated, it cannot be revoked. It’s valid for the project it is generated. So do not generate a license for trying out, as you’ll not be able to reuse it in other projects. For trial, you can instead generate a trial key.
The premium-ASP.NET Core Mvc source package comes with a logic that makes call to License.TryRegisterFromExecutionPath which instructs ASPSecurityKit to automatically locate and register the license key from file.
Create the database
The Premium-ASP.NET Core Mvc source package we had installed in a prior step, comes with EF migrations and T-SQL scripts, so you can create the database backing the models of your new project immediately.
- Verify the connectionString: Open appsettings.json file from Solution Explorer and verify that the DefaultConnection has a valid connectionString as per SQL Server version available on your machine. If it’s not, make the appropriate changes.
-
Open Package Manager Console and make sure that the selected project is the web application project we’ve been working with in this walkthrough.
-
Type the following command and hit enter:
update-database
-
If you receive an error stating something like:
-
“The term update-database is not recognized as the name of a cmdlet, function, script file, or operable program.”, you should close and restart Visual Studio, and open the same solution. For more information about this issue, check out the troubleshooting section.
-
“This Evaluation license has a quota of … operations for NetCore feature which has been exceeded.”, you likely don’t have the license key generated, and the trial limitations have been exceeded. For more information about this issue, check out the troubleshooting section.
-
-
Make sure that the database is created successfully.
- You will see messages something like “Applying migration …”. If all goes well, the last message that you see is “Done” (with EF Core; with EF framework, it’s “Running seed method”).
Application Configuration
The Premium-ASP.NET Core MVC source package has also come up with some useful configuration settings that the accompanying components make use of. You can have a look at them in the ‘app’ section of the appsettings.json file in the project root.
By default, most are populated with the default value or values you provided on the second step of the ‘Install a Source Package’ screen. The following settings related to email component aren’t populated by default and are required for email verification and forgot password flows to work:
"app": {
    ....
    "MailId": "[email protected]",
    "MailPassword": "password",
    "MailProvider": "Gmail",
    // "MailHost": "",
    // "MailPort": "",
    // "MailUseSSL": "",
    // "MailFrom": "",
    ....
},
The above settings are used by the Mailer component installed as Infrastructure\Mailer.cs in your project. MailId and MailPassword settings represent the SMTP credentials.
MailProvider setting can take one of six values: MailGun, SendGrid, Gmail, Outlook, Yahoo and Custom.
Additionally, you can use a setting MailFrom to specify the ‘from address’ if it’s different from the MailId (the username). This is usually true when you’re using a service like MailGun or SendGrid.
With Custom provider you need to at least specify the MailHost which should be the SMTP server host name. Custom lets you configure services like Amazon SES to send emails.
As you get the source with the Premium package, you can further extend the Mailer component if you want any further customization.
Note
To use Gmail, you need to enable “Less secure app access” etc. on your Gmail account. For more information, visit the support page.
Try it out
Press F5/ctrl+F5 to run the application. You can sign in using the [super admin] credentials – username as in the settings and the default password ‘admin’. You can also sign up and try out flows like email verification and account settings.
Congratulations for installing ASPSecurityKit! You are going to absolutely love the secure, flexible and rapid development basis it provides for your project!
Create the project
-
In Visual Studio, open the Create a new project dialog.
-
Choose the programming language as CSharp and ASP.NET Core Empty as the template.
Note
If you’re building on the .NET Framework, choose ASP.NET Web Application (.NET Framework) and then Empty template.
- Provide the project name and other information.
- Choose the target framework as ‘.NET Core 3.1’ and click on the Create button.
Install the ASPSecurityKit library package
As part of this step, we’ll install the ASPSecurityKit.ServiceStack NuGet package, which provides full ASPSecurityKit capabilities to build secure and reliable API platform/sservices on ServiceStack (for both .NET Core and .NET Framework). Check out the comprehensive security pipeline article to understand the multi-stage identity and access verification workflow ASPSecurityKit provides.
- Open Package Manager (PM) Console and make sure that the selected project is the web application project just created.
- Type the following command and hit enter:
install-package ASPSecurityKit.ServiceStack
- Make sure that the package installs successfully
You can also use the Package Manager UI to install the above package.
Install the source package into the project
As part of this step, we’ll install the Premium-ServiceStack .NET Core source package.
Follow these steps to install a source package. On the ‘Install a Source Package’ screen, make sure you select NetCoreServiceStack as the platform (NetFrameworkServiceStack if you’re building on the .NET Framework instead) and Premium as the source package. If the package doesn’t appear, it means you haven’t bought it. You can click on Show all checkbox and then click on the Buy button to purchase this package.
Upon successful installation, you should see several new items added to the project.
Generate license key for the project
You cannot perform subsequent steps without generating a license key for this project because the number of operations permitted for trial has been exceeded by the source code you’ve obtained from the Premium-ServiceStack .NET Core source package.
Follow these steps to generate a license key. On the ‘Generate License Key’ screen, make sure you select NetCoreApi as the platform (NetFrameworkServiceStack if you’re building on the .NET Framework instead). If no subscription appears, it means you either haven’t bought one or have consumed it already. You can click on ‘Buy More’ to open the Dashboard to purchase a new subscription.
Important
Once a license key is generated, it cannot be revoked. It’s valid for the project it is generated. So do not generate a license for trying out, as you’ll not be able to reuse it in other projects. For trial, you can instead generate a trial key.
The Premium-ServiceStack .NET Core source package comes with a logic that makes call to License.TryRegisterFromExecutionPath which instructs ASPSecurityKit to automatically locate and register the license key from file.
Create the database
The Premium-ServiceStack .NET Core source package we had installed in a prior step, comes with EF migrations and T-SQL scripts, so you can create the database backing the models of your new project immediately.
- Verify the connectionString: Open appsettings.json file from Solution Explorer and verify that the DefaultConnection has a valid connectionString as per SQL Server version available on your machine. If it’s not, make the appropriate changes.

-
Open Package Manager Console and make sure that the selected project is the web application project we’ve been working with in this walkthrough.
-
Type the following command and hit enter:
update-database
-
If you receive an error stating something like:
-
“The term update-database is not recognized as the name of a cmdlet, function, script file, or operable program.”, you should close and restart Visual Studio, and open the same solution. For more information about this issue, check out the troubleshooting section.
-
“This Evaluation license has a quota of … operations for NetCore feature which has been exceeded.”, you likely don’t have the license key generated, and the trial limitations have been exceeded. For more information about this issue, check out the troubleshooting section.
-
-
Make sure that the database is created successfully.
- You will see messages something like “Applying migration …”. If all goes well, the last message that you see is “Done” (with EF Core; with EF framework, it’s “Running seed method”).
Application Configuration
The Premium-ServiceStack .NET Core source package has also come up with some useful configuration settings that the accompanying components make use of. You can have a look at them in the ‘app’ section of the appsettings.json file in the project root.
By default, most are populated with the default value or values you provided on the second step of the ‘Install a Source Package’ screen. The following settings related to email component aren’t populated by default and are required for email verification and forgot password flows to work:
"app": {
    ....
    "MailId": "[email protected]",
    "MailPassword": "password",
    "MailProvider": "Gmail",
    // "MailHost": "",
    // "MailPort": "",
    // "MailUseSSL": "",
    // "MailFrom": "",
    ....
},
The above settings are used by the Mailer component installed as Infrastructure\Mailer.cs in your project. MailId and MailPassword settings represent the SMTP credentials.
MailProvider setting can take one of six values: MailGun, SendGrid, Gmail, Outlook, Yahoo and Custom.
Additionally, you can use a setting MailFrom to specify the ‘from address’ if it’s different from the MailId (the username). This is usually true when you’re using a service like MailGun or SendGrid.
With Custom provider you need to at least specify the MailHost which should be the SMTP server host name. Custom lets you configure services like Amazon SES to send emails.
As you get the source with the Premium package, you can further extend the Mailer component if you want any further customization.
Note
To use Gmail, you need to enable “Less secure app access” etc. on your Gmail account. For more information, visit the support page.
Try it out
Press F5/ctrl+F5 to run the application. You can sign in using the [super admin] credentials – username as in the settings and the default password ‘admin’. You can also sign up and try out flows like email verification and account settings.
Congratulations for installing ASPSecurityKit! You are going to absolutely love the secure, flexible and rapid development basis it provides for your project!